
In Part 1 of our updated Google Tag Manager Tutorial, we covered the tracking of outbound (external) links. If you missed it, you may want to start here. In this second part, we will walk you through the process of setting up tracking for file downloads from your website. If you offer downloadable resources like eBooks, PDFs, or whitepapers then you probably want to track how often your visitors download this content. Tracking downloads on your website can help you figure out what interests your visitors and help you determine what type of content your audience really wants.
Google Analytics does not automatically track this activity but Google Tag Manager (GTM) offers an easy, automated solution for tracking downloads.
In this tutorial, we assume that you already have a Google Tag Manager account, have created a Container, and have installed it on your website. You should also have a Google Analytics account set up for your website and have linked it to GTM.
Set up download link tracking by following the steps below.
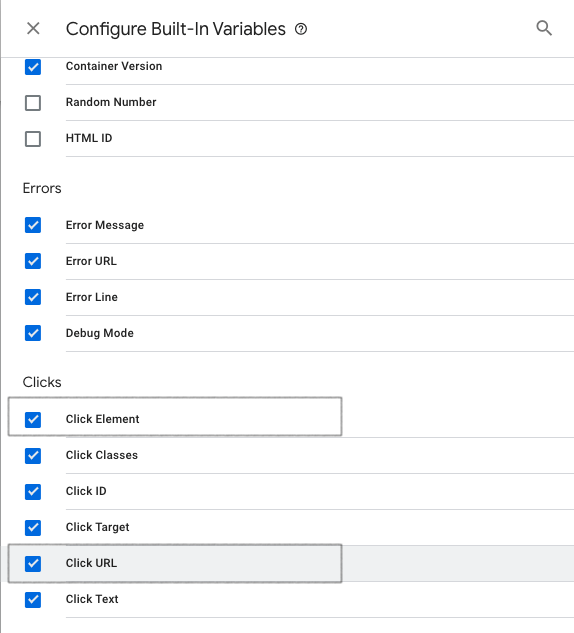
Step 1: Enable The Variables “Click Element” and “Click URL”
In Google Tag Manager, you have a variety of built-in variables to select from, as well as the option to create your own custom variables if needed. For this setup, you will require the built-in variables “Click Element” and “Click URL”. If you have not used these variables before, then you have to select and enable them. To do so, navigate to “Variables”, and in the section “Built-In Variables” click on “Configure”. Scroll to the various Click-Variables and set a checkmark for “Click Element” and “Click URL”.
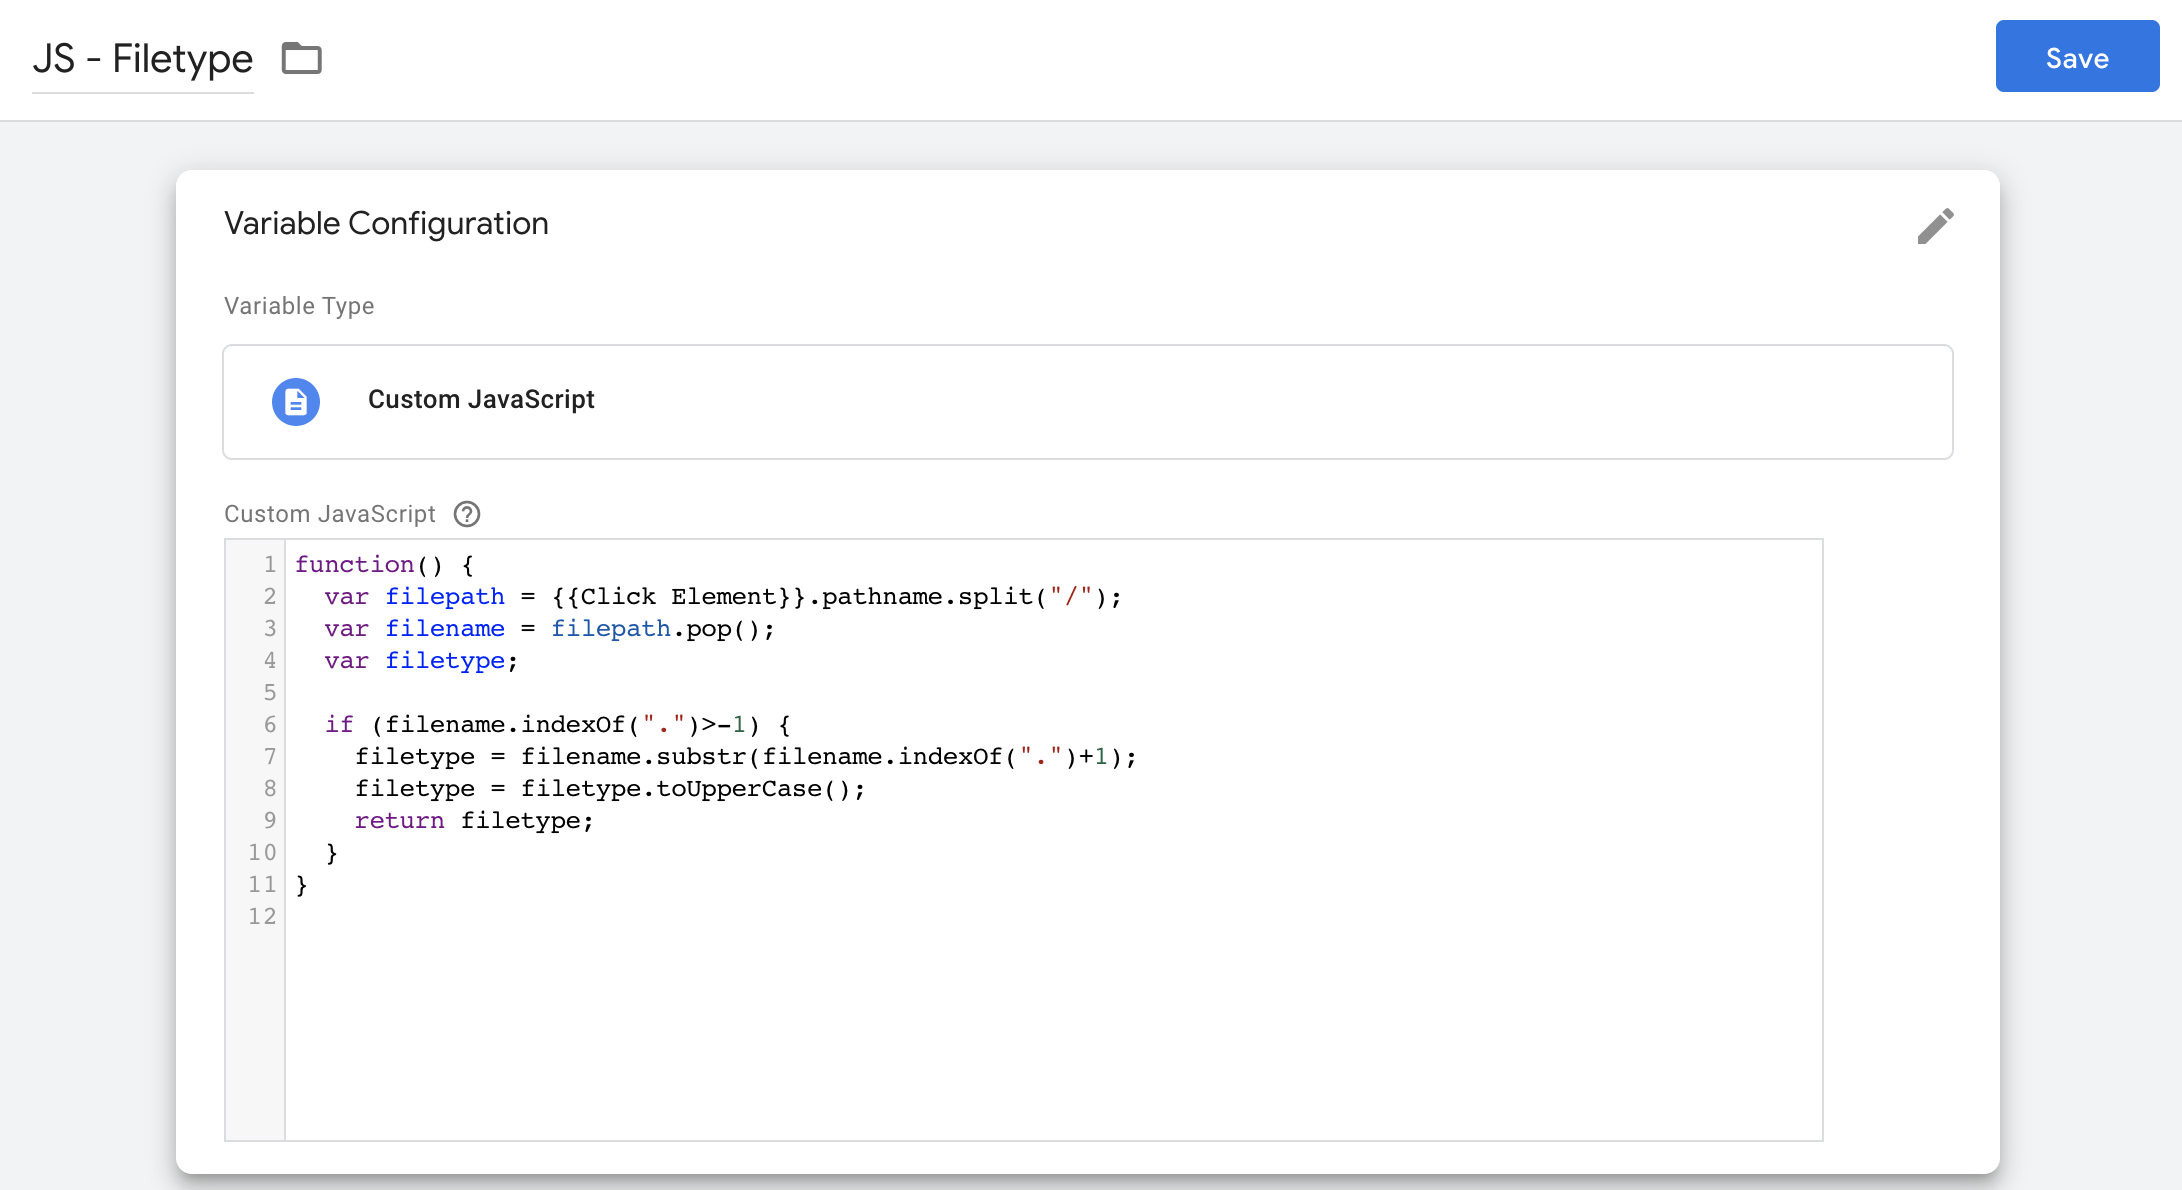
Step 2: Create a Custom JavaScript Variable
This user-defined variable is made up of a few lines of JavaScript that remove the file extension off the end of a link so that you can easily split the downloads by filetype in Google Analytics.
To set this up, go to “Variables” in the Google Tag Manager user interface, and scroll down to “User-Defined Variables” and click “New”. From the variable selector, choose “Custom JavaScript” as the variable template.
Set your variable configuration:
- Replace “Untitled Variable” with a descriptive name like “JS – Filetype”.
- Copy and paste the following code into the “Custom JavaScript” input box and then click “Save”.
function() {
var filepath = {{Click Element}}.pathname.split("/");
var filename = filepath.pop();
var filetype;
if (filename.indexOf(".")>-1) {
    filetype = filename.substr(filename.indexOf(".")+1);
    filetype = filetype.toUpperCase();
    return filetype;
    }
}
Your variable should look like this:
Step 3: Create the “Just Links” Trigger
This trigger determines whether a click on a link is a file download. It gives a long list of file extensions, and if a link URL contains one of them, then the rule fires the trigger and the tag comes into action. Optionally, you can customize these file extensions to include only the ones that interest you, or add other ones specific to the type of downloads you offer on your site.
To set up the trigger for download link clicks, follow these steps:
- Navigate to “Triggers” in the left-hand sidebar and create a new one.
- Provide a descriptive name like “Link Clicks – Downloads”.
- Choose Trigger Type: “Click – Just Links”
- For the trigger condition, set it to “Some Link Clicks” > Variable: “Click URL” > “matches RegEx (ignore case)” > “^.*\.(7z|aac|arc|arj|asf|asx|avi|bin|csv|doc|exe|flv|gz|gzip|hqx|jar|js|mp(2|3|4|e?g)|mov(ie)?|msi|msp|pdf|phps|ppt|qtm?|ra(m|r)?|sea|sit|tar|tgz|torrent|txt|wav|wma|wmv|wpd|xls|xml|z|zip)$”
- “Wait for Tags” and “Check Validation” options: “Wait for Tags” ensures that all tags that fire with this trigger are executed first before proceeding with the action of the event. For your “Just Links” trigger, the file download is halted long enough for all dependent tags to complete, after which the download is resumed. “Check Validation” checks if the click was actually valid. These can be set freely but we would recommend leaving them unchecked for this trigger in most situations.
- Click “Save”
This is what the trigger configuration looks like:
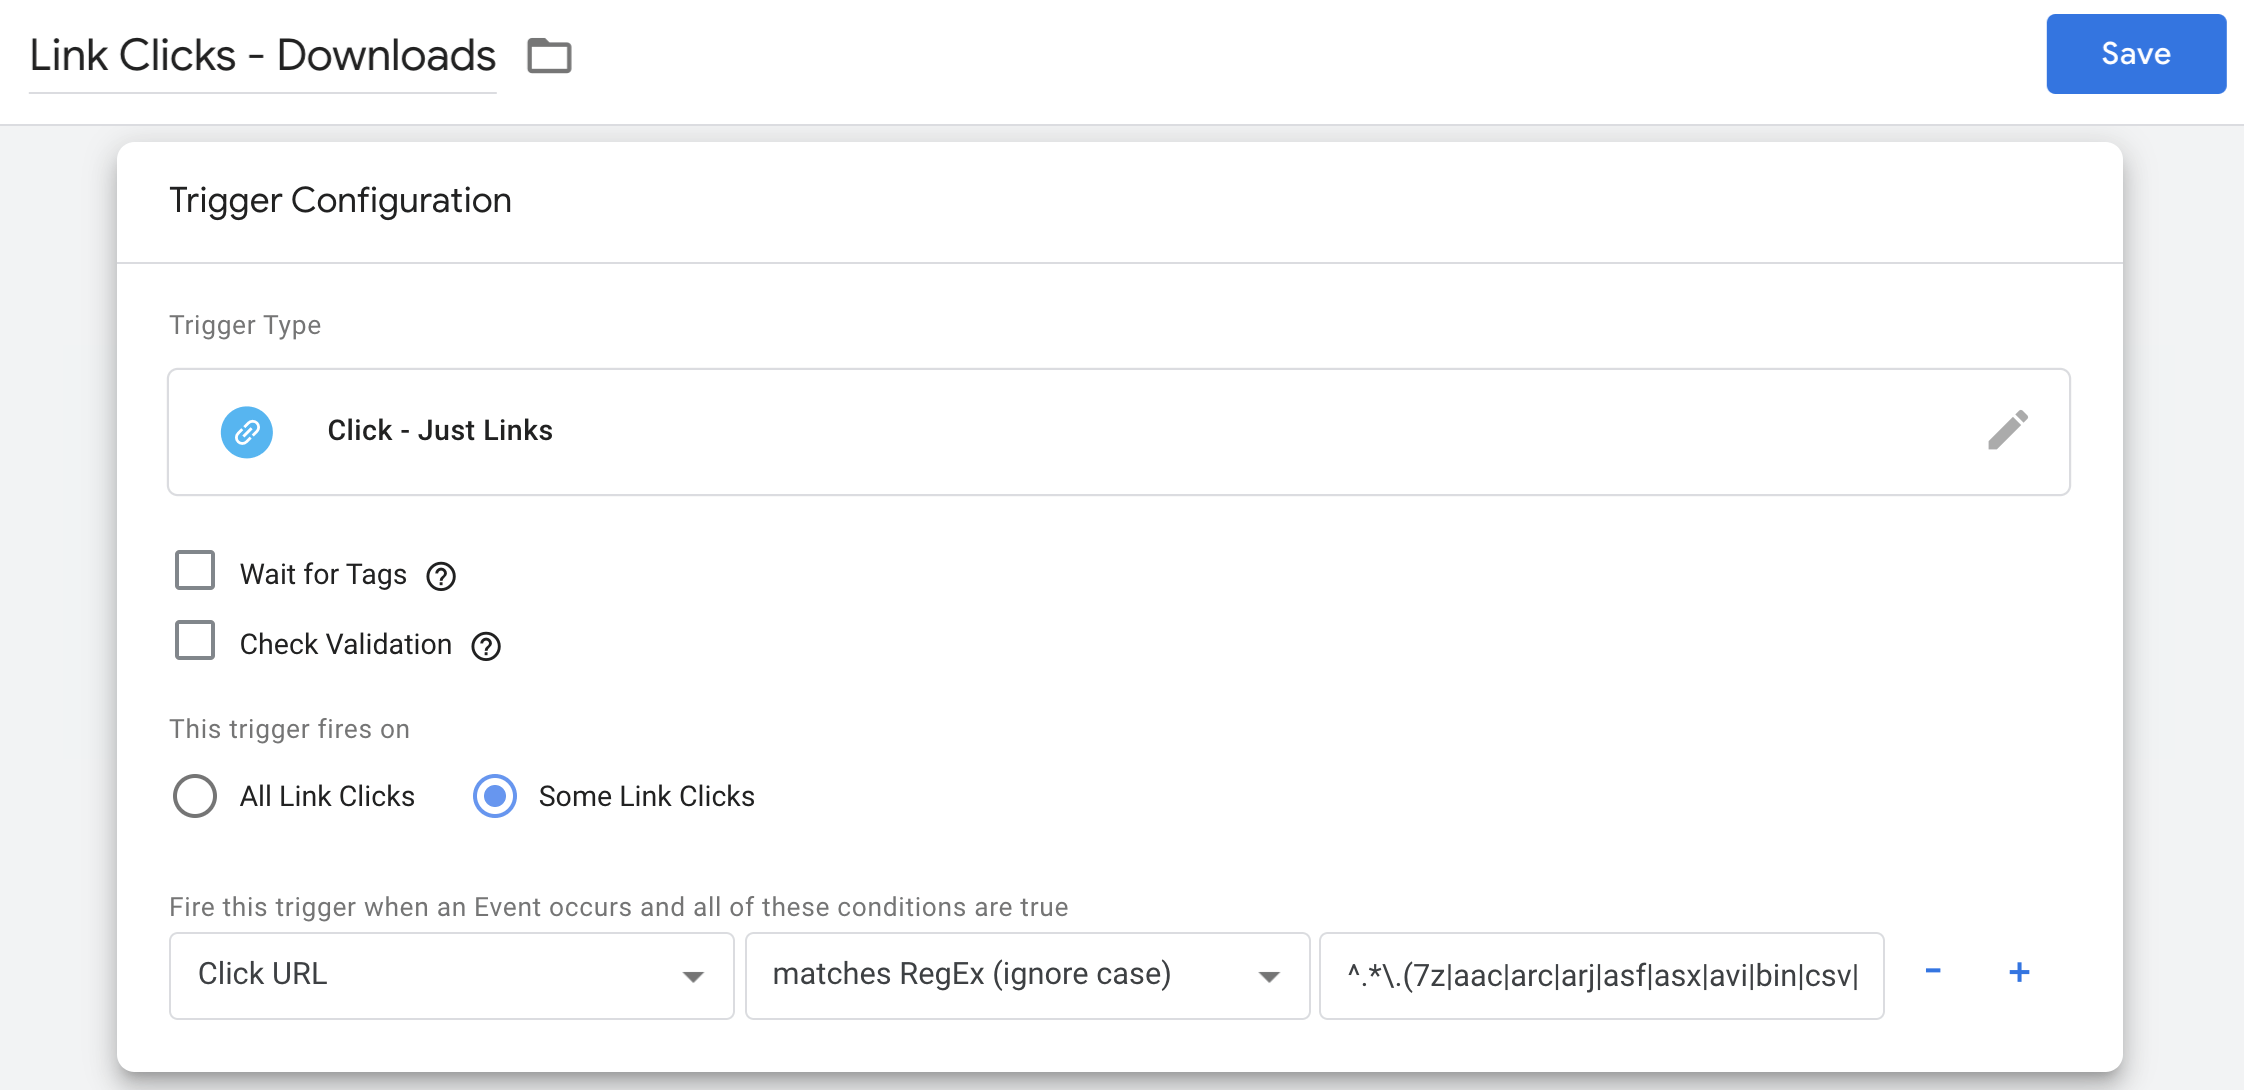
Change the list of “|” separated file extensions in the fire conditions if you only want to track certain types of downloads.
Step 4: Create the Download Click Event Tag
This tag will use the Custom JS Variable and the trigger you created. This will record clicks on links that have the file extensions that you set up in the trigger in Google Analytics.
Create it by following these steps:
- Go to > “Tags” > “New” to create a new tag
- Name it “GA – Event – Downloads”
- For your tag configuration, choose “Google Analytics: Universal Analytics” as your Tag Type.
- Track Type: “Events”
Enter the following settings as displayed:

In the below section “Triggering” add your pre-configured trigger from step 3.
The download events that this tag tracks will appear in the Events Report (Section “Behaviour”) in Google Analytics with the category “Downloads”. The event action will appear as the type of file (PDF, DOC, etc.), and the label will show the URL of the download link.
Step 5: Save a Version, Test, and Publish
The tag you just created will not start working until you publish it but, first, you should thoroughly test that it is working as expected. Having saved your tag, enable the Preview mode (click on “Preview” in the top right corner), go to your website, and refresh the page.
Make sure to cover these test scenarios for download link tracking:
- Click a download link: the GA tag “GA – Event – Downloads” must fire.
- Click any other link, e.g. social media profile: the tag must not fire.
The Google Analytics Real-Time Event Report should display your event hits if everything is working properly. Read our blog post on Google Tag Manager Testing Problems and how to fix them if you run into any issues.
If all your tests are successful, then you can click the “Submit” button in GTM. Give this published version a name like “Download link event added” and click “Publish”.
Next Tutorial Coming Up
In this second part of our guide, we have explained how you can easily set up automated download link tracking with the help of the Custom JavaScript and built-in variables in Google Tag Manager.
Now that you have used some of the functionalities in GTM, you are hopefully ready to jump into more complex tracking scenarios. Part 3 of this tutorial will dive deeper into the possibilities of the tag management tool. Stay tuned for our next update!